
In essence the following four execution techniques will be covered:
- Dynamic Allocation of Memory
- Function Pointer Execution
- .TEXT-Segment Execution
- RWX-Hunter Execution
Especially the first two techniques are very widely known and most should be familiar with these, however, the latter two might be new to some.
Each of these techniques describes a way of executing code in a different memory section, therefore it is necessary to review a processes memory layout as a first step.
A Processes Memory Layout
The first concept that needs to be understood is that the entire virtual memory space is split into two relevant parts: Virtual memory space reserved for user processes (user space) and virtual memory space reserved for system processes (kernel space), as shown below:

This visual representation is based on Microsoft’s description given here: https://docs.microsoft.com/en-us/windows-hardware/drivers/gettingstarted/virtual-address-spaces.
The first takeaway from this is that each process gets its own, private virtual address space, where the “kernel space” is kind of a “shared environment”, meaning each kernel process can read/write to virtual memory anywhere it wants to. Please note the latter is only true for environments without Virtualization-based Security (VBS), but that’s a different topic.
The representation above shows what the global virtual address space looks like, let’s break this down for a single process:

A single processes virtual memory space consists of multiple sections that are placed somewhere within the available space boundaries by Address Space Layout Randomization (ASLR). Most of these sections should be familiar, but to keep everyone on the same page, here is a quick rundown of these sections:
.TEXT Segment: This is where the executable process image is placed. In this area you will find the main entry of the executable, where the execution flow starts.
.DATA Segment: The .DATA section contains globally initialized or static variables. Any variable that is not bound to a specific function is stored here.
.BSS Segment: Similar to the .DATA segment, this section holds any uninitialized global or static variables.
HEAP: This is where all your dynamic local variables are stored. Every time you create an object for which the space that is needed is determined at run time, the required address space is dynamically assigned within the HEAP (usually using alloc() or similar system calls).
STACK: The stack is the place every static local variable is assigned to. If you initialize a variable locally within a function, this variable will be placed on the STACK.
Dynamically Allocate Memory
After defining the basics, let’s have a look on what is needed to execute shellcode within your process memory space. In order to execute your shellcode you need to complete the following three checks:
- You need virtual address space that is marked as executable (otherwise DEP will throw an exception)
- You need to get your shellcode into that address space
- You need to direct the code flow to that memory region
The text book method to complete these three steps is to use WinAPI calls to dynamically allocate readable, writeable and executable (RWX) memory and start a thread pointing to the freshly allocated memory region. Coding this in C would look like this:
#include <windows.h>

int main()
{

	char shellcode[] = "\xcc\xcc\xcc\xcc\x41\x41\x41\x41";

	// Alloc memory
	LPVOID addressPointer = VirtualAlloc(NULL, sizeof(shellcode), 0x3000, 0x40);
	// Copy shellcode
	RtlMoveMemory(addressPointer, shellcode, sizeof(shellcode));
	// Create thread pointing to shellcode address
	CreateThread(NULL, 0, (LPTHREAD_START_ROUTINE)addressPointer, NULL, 0, 0);
	// Sleep for a second to wait for the thread
	Sleep(1000);
	return 0;
}
As it will be shown in the following screenshots, when compiling and executing the above code, the shellcode will be executed from the heap, which is by default protected by the system wide Data Execution Prevention (DEP) policy that has been introduced in Windows XP (for details on this see: https://docs.microsoft.com/en-us/windows/desktop/memory/data-execution-prevention). For DEP enabled processes this would prevent code execution in this memory region. To overcome this burden we ask the system to mark the required memory region as RWX. This is done by specifying the last argument to VirtualAlloc to be 0x40, which is equivalent to PAGE_EXECUTE_READWRITE, as specified in https://docs.microsoft.com/en-us/windows/desktop/memory/memory-protection-constants.
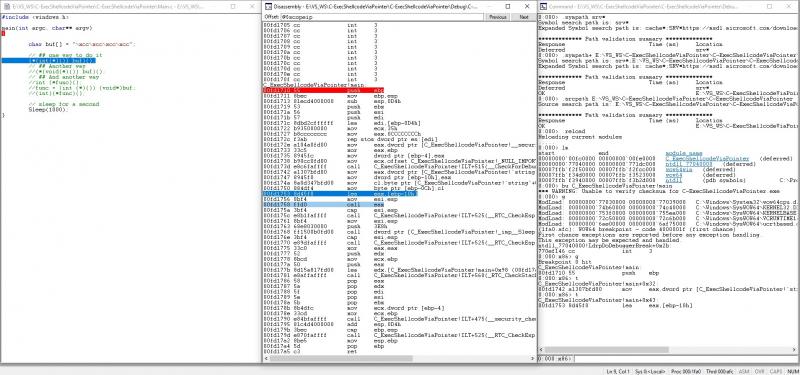
So far so good, but how would that code behave in memory? To analyse this we’ll use WinDbg (https://docs.microsoft.com/en-us/windows-hardware/drivers/debugger/debugger-download-tools). If you have never set up WinDbg before, refer to the following screenshot to get an idea of how to point WinDbg to your source code, list all loaded modules, set a break point and run your program:

After entering “g” in the WinDbg’s command line the program will break into the main function of your executable. If you then step through your code to the point after RtlMoveMemory is called, you will face something like the following in WinDbg:

As indicated by the violet line we are currently right after the call to RtlMoveMemory. If we refer to the code above, RtlMoveMemory takes a Pointer from VirtualAlloc to write our shellcode to the given location. As the pointer returned from VirtualAlloc is the first argument to RtlMoveMemory, it will be pushed on stack last (within register ecx) before calling the function, as function parameters get pushed on the stack in reverse order. If we would have stopped right before the call to RtlMoveMemory the ecx register would show the address location to be ‘0x420000’, which in the above screenshot has been placed into the eax register after the WinAPI call.
Inspecting the memory location at address 0x420000 in the screenshot above, shows that our shellcode has been placed at this address. Furthermore, note that the stack base address (ebp) is shown as 0x5afa34 and the stack pointer (esp – the top address of the stack) is pointing to 0x5af938, spanning the stack across the addresses in this range. As the memory location of the shellcode is not within the stack range we can safely conclude it has been placed on the heap instead.
|
The key takeaway parts: |
|
|
The PROs |
The CONs |
Function Pointer Execution
In contrast to the vanilla approach above, another technique to execute shellcode within memory is by the use of function pointers, as shown in the code snippet below:
#include <windows.h>

int main()
{
	char buf[] = "\xcc\xcc\xcc\xcc";

	// One way to do it
	int (*func)();
	func = (int (*)()) (void*)buf;
	(int)(*func)();
              // Shortcut way to do it
	// (*(int(*)()) buf)();

	// sleep for a second
	Sleep(1000);
              return 0;
}
The way this code works is as follows:
- A pointer to a function is declared, in the above code snippet that function pointer is named ‘func’
- The declared function pointer is than assigned the address of the code to execute (as any variable would be assigned with a value, the func pointer is assigned with an address)
- Finally the function pointer is called, meaning the execution flow is directed to the assigned address.
Applying the same steps as above we can analyse this in memory with WinDbg, which takes us to the following:

The key steps that lead to code execution in this case are the following:
- The shellcode, contained in a local variable, is pushed onto the stack during initialization (relatively close the ebp, as this is one of the first things to happen in the main-method)
- The shellcode is loaded from the stack into eax as shown at address 0x00fd1753
- The shellcode is executed by calling eax as shown at address 0x00fd1758
Referring back to the virtual memory layout of a single process shown above, it is stated that the stack is only marked as RW memory section with regards to DEP. The same problem occurred before with dynamic allocation of heap memory, in which case a WinAPI function (VirtualAlloc) was used to mark the memory section as executable. In this case we’re not using any WinAPI functions, but luckily we can simply disable DEP for the compiled executable by setting the /NXCOMPAT:NO flag (for VisualStudio this can be set within the advanced Linker options). The result is happily executing shellcode.
|
The key takeaway parts: |
|
|
The PROs The stack is writeable and readable, which allows modification of the shellcode within this memory region. This allows shellcode encoding/encryption. |
The CONs |
.TEXT Segment Execution
So far we have achieved code execution within the heap and the stack, which are both not executable by default and therefore we were required to use WinAPI functions and disabling DEP respectively to overcome this.
We could avoid using such methods with code execution in a memory region that is already marked as executable.
A quick reference back to the memory layout above shows that the .TEXT segment is such a memory region.
The .TEXT segment needs to be executable, because this is the section that contains your executable code, such as your main-function.
Sounds like a suitable place for shellcode execution, but how can we place and execute shellcode in this section. We can’t use WinAPI functions to simply move our shellcode into here, because the .TEXT segment is not writable and we can’t use function pointers as we don’t have a reference in here to point at.
The solution here is Inline-Assembly (https://docs.microsoft.com/en-us/cpp/assembler/inline/inline-assembler?view=vs-2019), which can be used to embed our shellcode within our main-method.
Shoutout to @MrUn1k0d3r at this point, who showed an implementation of this technique here: https://github.com/Mr-Un1k0d3r/Shellcoding. A slightly shortened version of his code shown below:
#include <Windows.h>

int main() {
	asm(".byte 0xde,0xad,0xbe,0xef,0x00\n\t"
		"ret\n\t");
	return 0;
}
To compile this code the GCC compiler is required, due to the use of the “.byte” directive. Luckily there is a GCC compiler contained in the MinGW project and we can easily compile this as follows:
mingw32-gcc.exe -c Main.c -o Main.o
mingw32-g++.exe -o Main.exe Main.o
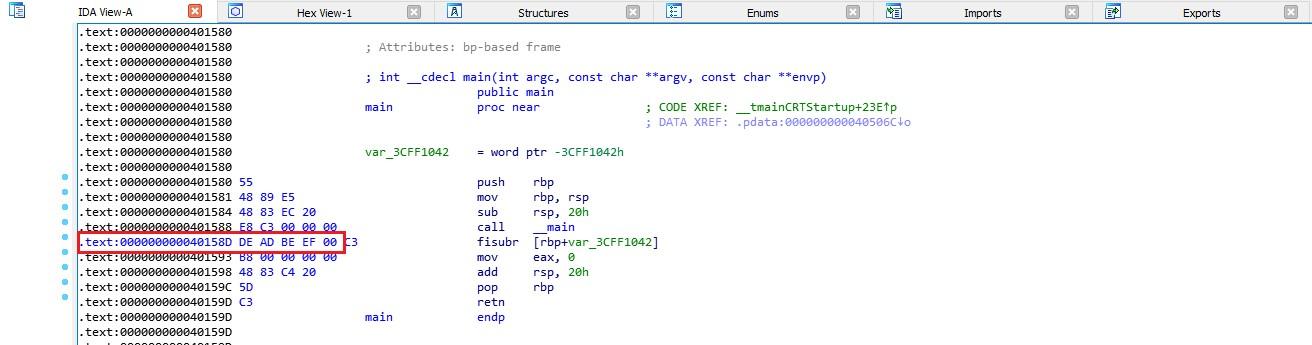
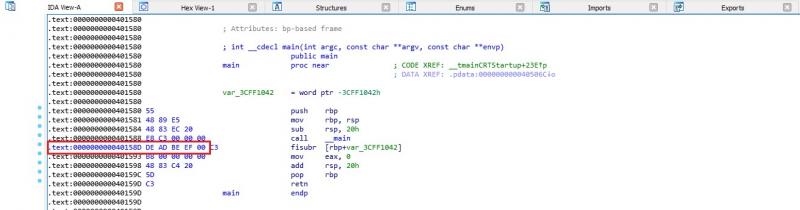
Viewing this in IDA reveals that our shellcode has been embed into the .TEXT segment (IDA is just a bit more visual than WinDbg here):

The defined shellcode ‘0xdeadbeef’ has been placed within the assembled code right after the call to __main, which is used as initialization routine. As soon as the __main function finishes the initialization our shellcode is executed right away.
|
The key takeaway parts: |
|
|
The PROs |
The CONs As such malicious shellcode is easily detectable by AVs/EDRs if not customized. |
RWX-Hunter Execution
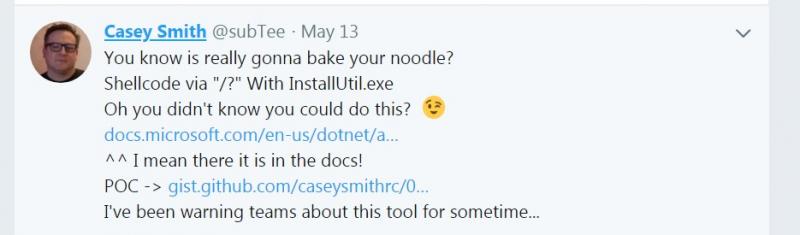
Last, but not least, after using the default executable .TEXT segment for code execution and creating non-default executable memory sections with WinAPI functions and by disabling DEP, there is one last path to go, which is: Searching for memory sections that have already been marked as read (R), write (W) and executable (X) – which i stumbled across reading @subTee post on InstallUtil’s help-functionality code exec.

The basic idea for the RWX-Hunter is running through your processes virtual memory space searching for a memory section that is marked as RWX.
The attentive reader will now notice that this only fulfils only 1/3 of the defined steps for code execution, that i set up initially, which is: Finding executable memory. The task of how to get your shellcode into this memory region and how to direct the code flow to there is not covered with this approach. However, the concept still fits well in this guide and is therefore worth mentioning.
The first question that needs to be answered is the range of where to search for RWX memory sections. Once again referring back to the initial description of a processes private virtual memory space it is stated that a processes memory space spans from 0x00000000 to 0x7FFFFFFFF, so this should be the search range.
The Code-Snippet, which I’ve ported to C from @subTee C# gist here, to implement this could look like the following (honestly i prefer this in C#, but since all of the above code is in C i stick to consistency):
long MaxAddress = 0x7fffffff;
long address = 0;
do
{
	MEMORY_BASIC_INFORMATION m;

	int result = VirtualQueryEx(process, (LPVOID)address, &m, sizeof(MEMORY_BASIC_INFORMATION));
	if (m.AllocationProtect == PAGE_EXECUTE_READWRITE)
	{
		printf("YAAY - RWX found at 0x%x\n", m.BaseAddress);
		return m.BaseAddress;
	}
	if (address == (long)m.BaseAddress + (long)m.RegionSize)
		break;
	address = (long)m.BaseAddress + (long)m.RegionSize;
} while (address <= MaxAddress);
This implementation is pretty much straight forward for what we want to achieve. A processes private virtual memory space (the user land virtual memory space) is searched for a memory section that is marked with PAGE_EXECUTE_READWRITE, which again maps to 0x40 as seen in previous examples. If that space is found it is returned, if not the next search address is set the next memory region (BaseAddress + Memory Region).
To complete this into code execution your shellcode needs then to be moved to that found memory region and executed. An easy way to do this would to fall back to WinAPI calls as shown in the first technique, but the CONs of that approach should be considered as stated above. At the end of this post I’ll share usable PoCs for references of how this could be implemented (for the RWX-Hunter you might also want to check out @subTee’s implementation linked above).
For the creative minds: There are also other techniques (some of them are surely still to be uncovered) to achieve steps 2. & 3.. To get shellcode into the found memory region (Step 2.) a Write-What-Where condition could become useful, as for example used in the AtomBombing technique that came up a few years back (the technique was initially published here). To finally execute the placed shellcode (Step 3.) ROP-gadgets might become useful… (a good introduction to ROP gadgets can be found here or on Wikipedia).
|
The key takeaway parts: |
|
|
The PROs |
The CONs |
And Finally:
A complete set of working PoCs is published here: https://github.com/csandker/inMemoryShellcode