
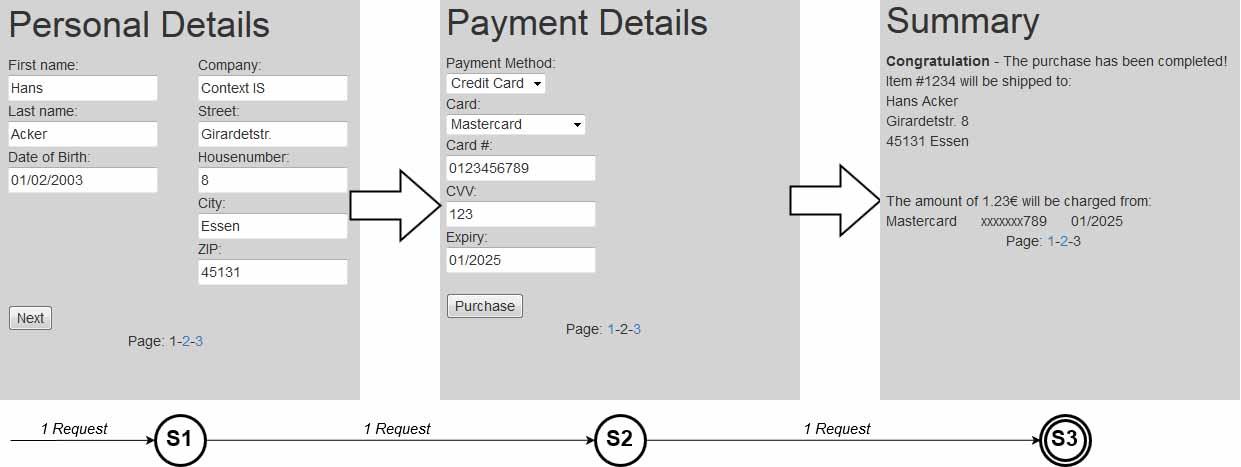
Let’s take the following multi-step form (fig.1) as the target. It’s a payment form divided into 3 pages – “Personal Details”, “Payment Details” and “Summary” page.

Figure 1: A multi-step form with two input pages (8 + 5 = 13 input fields) and one result page
We elaborated in part 1 of this series on why a naïve approach of simply testing the input and output validation between the single pages is not enough; and, how one has to go all the way through the process, minding the different permitted workflows.
For example, it might very well be possible that the output on the summary page (figure above) is properly escaped. But the process depicted above is not a one-way street, it is possible to go back and forth to make changes. Now when we go back from the summary page to page 2 an interesting thing happens in our sample application: The server sends us not only the input fields but already prefilled them with our previous input. Suddenly we got a new point of reflection that could be subject to Cross-Site Scripting (XSS). We would have missed that if we only ever went forward through the multi-step form.
With this background in mind we will now discuss the how to test multi-step forms using standard penetration testing tools.
Multi-Step Fuzzing with Burp Macros
A popular tool among penetration testers (“pentesters”) is the multipurpose proxy Burp Suite (Burp), which among other things is used to intercept and modify HTTP(S) request and responses. Burp comes with a powerful Macro engine that can be utilised to automate the process of fuzzing multi-step forms.
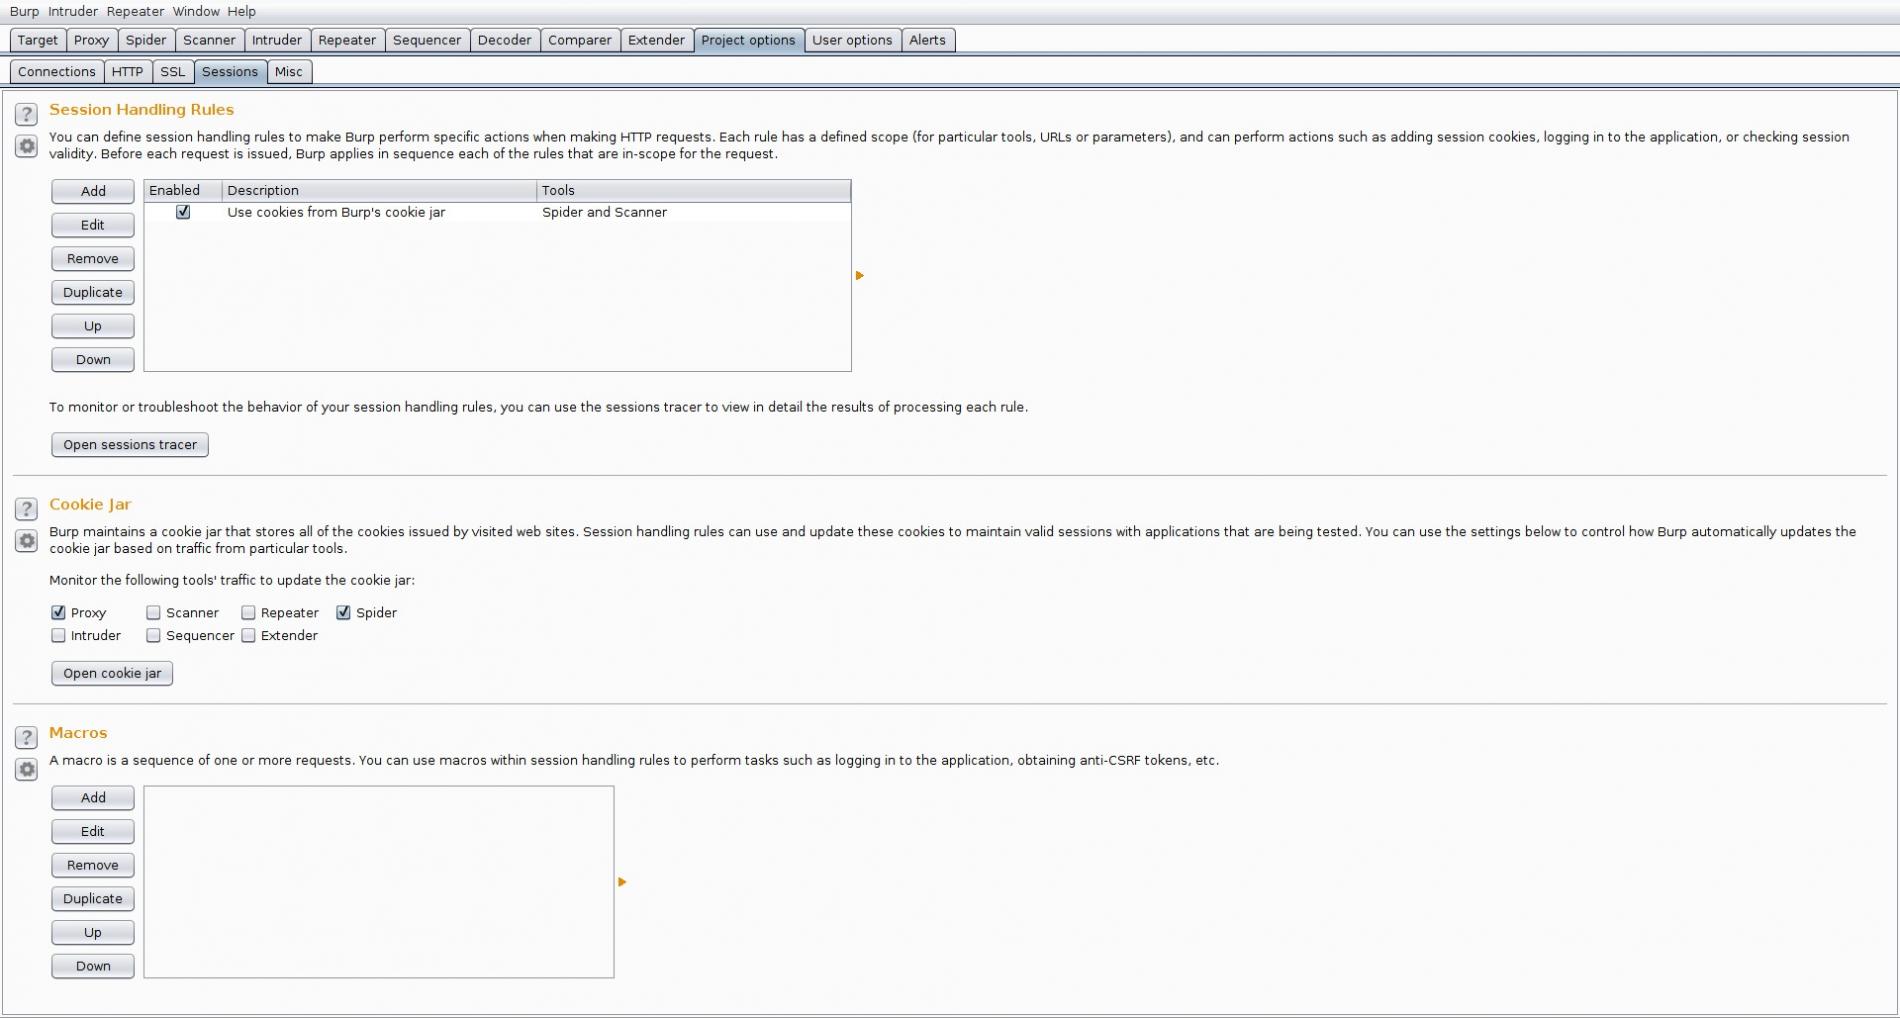
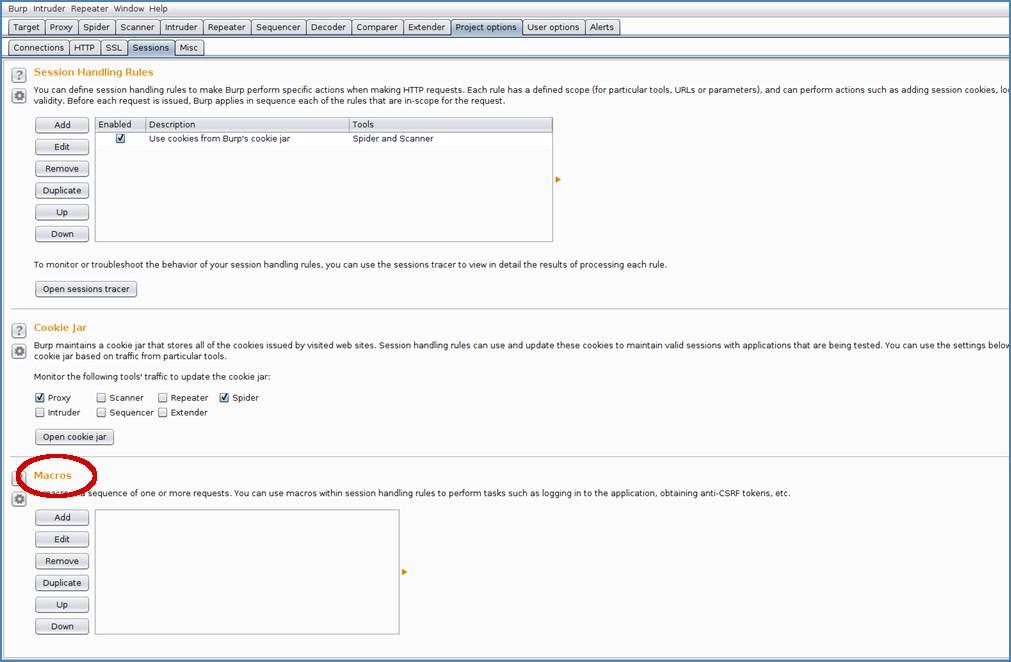
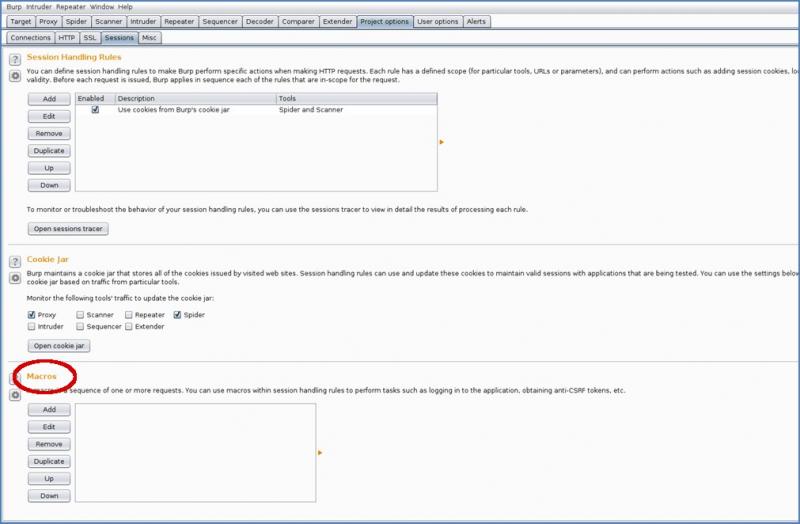
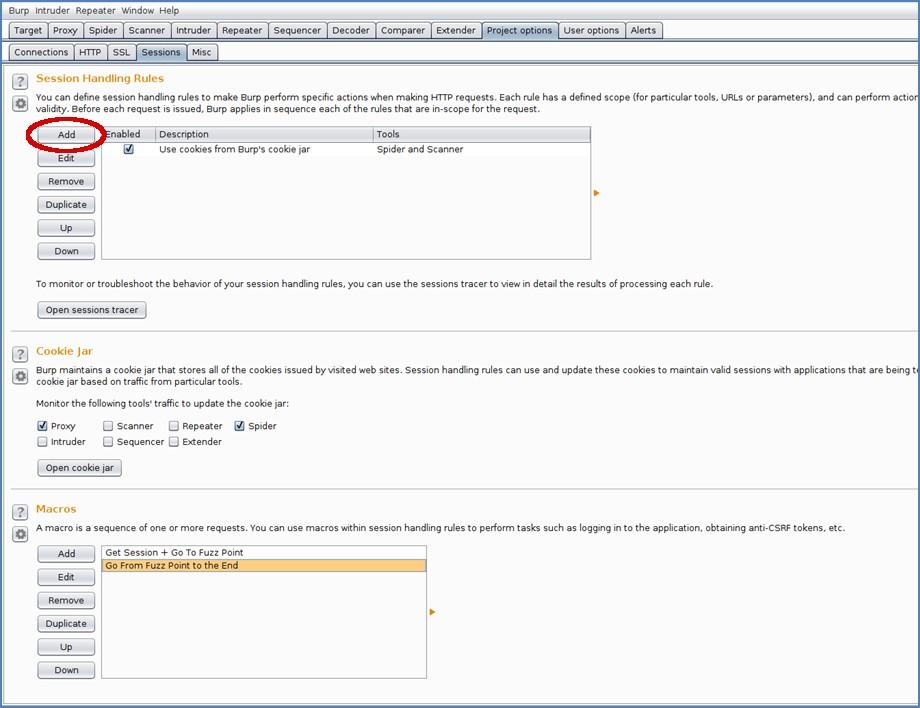
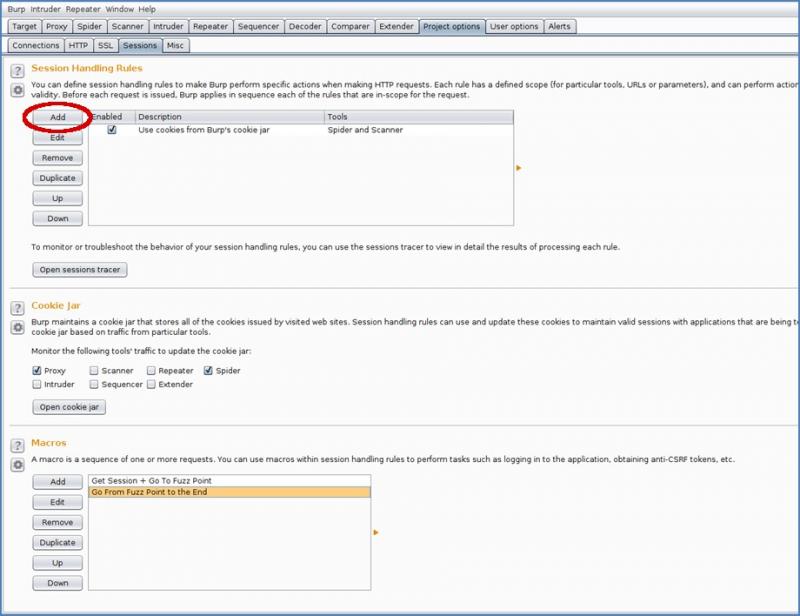
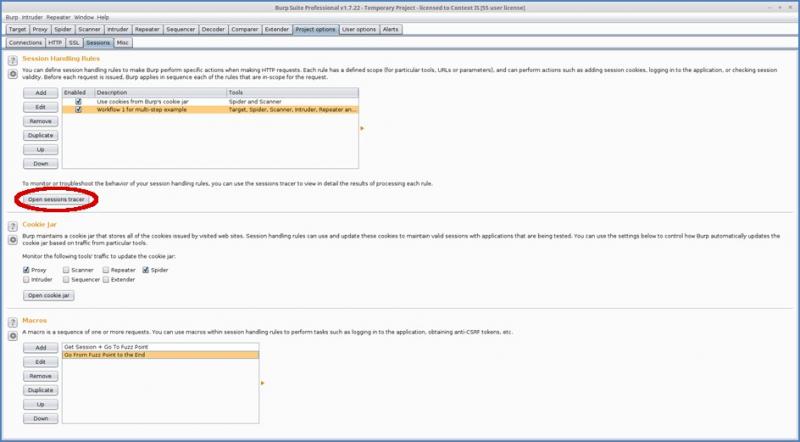
The Macro settings are tucked away under ‘Project options’ -> ‘Session’. This ‘Session’ tab is split into three sections:

- Session Handling Rules: This is probably the most important part, which among other things allows us to define when a macro is executed.
- Cookie Jar: These settings allow us to control which Burp tools can use and modify cookies from the Cookie Jar. For our example, we don’t need to change anything here.
- Macros: This is where we will define our Macros. A defined Macro will consist of an arbitrary amount of requests that will be issued sequentially. Burp is able to extract values from these responses and use them in a later request.
Step 0: Understanding the workflow
The very first step is to understand the actual workflow, discover its different options and possible decision branches, e.g. the input and output for a health insurance application might differ from that of a car insurance even if both policies can be requested in the same multi-step process.
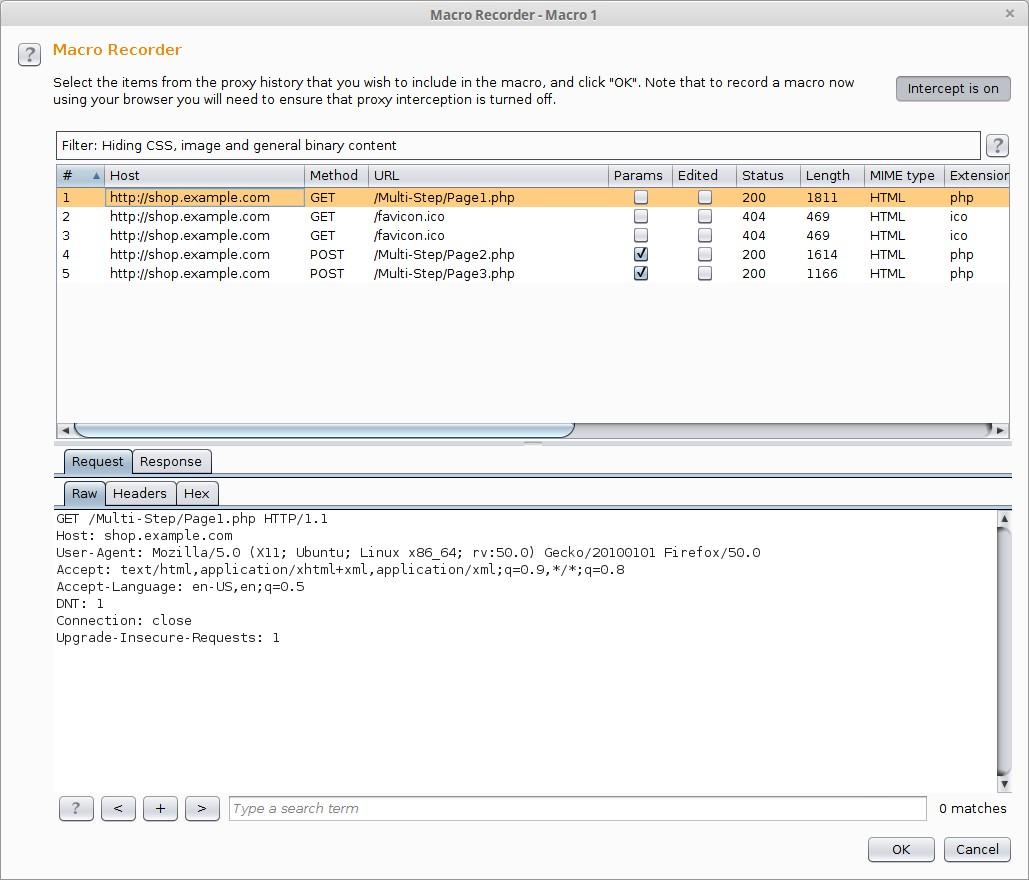
Hence, we will first follow the workflow from the beginning to the end, making sure we use valid data that will create a ‘known good’ result. In our example this is straight forward, there are only 3 requests (ignore the favicon.ico that Firefox tries to fetch for us).

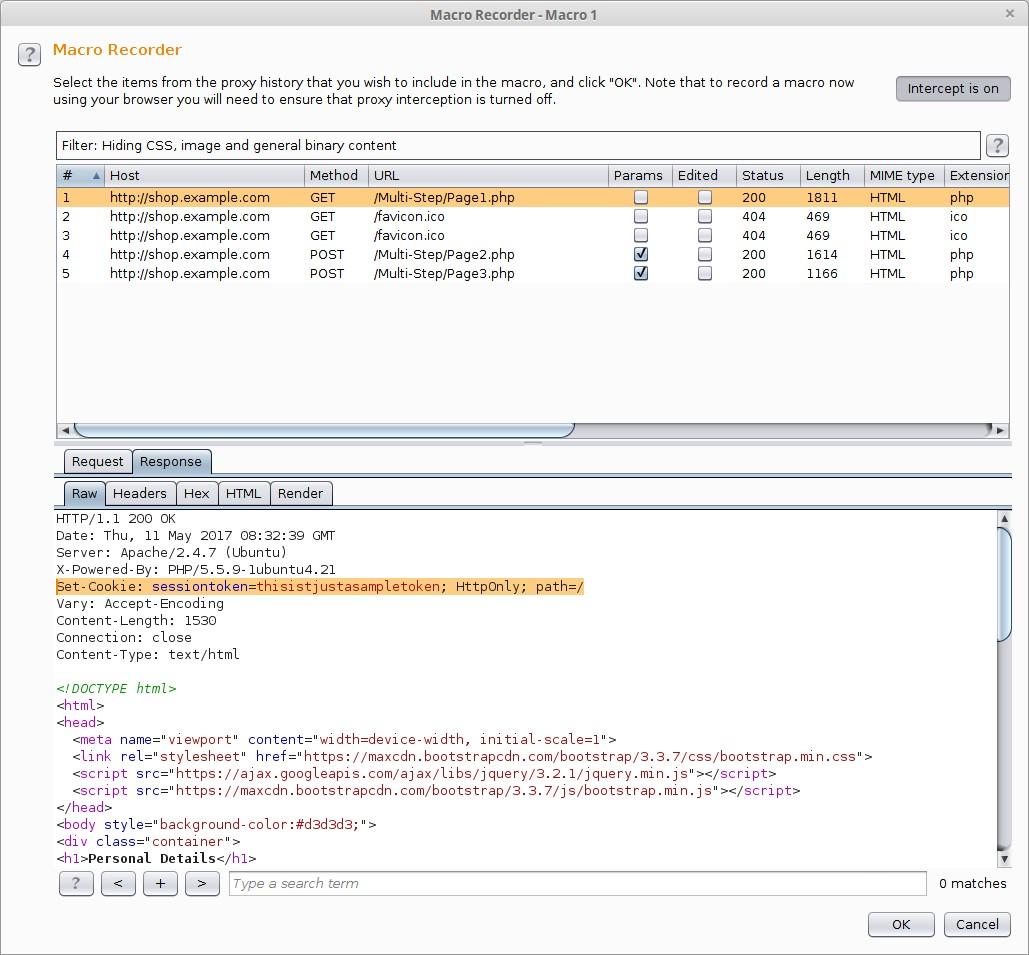
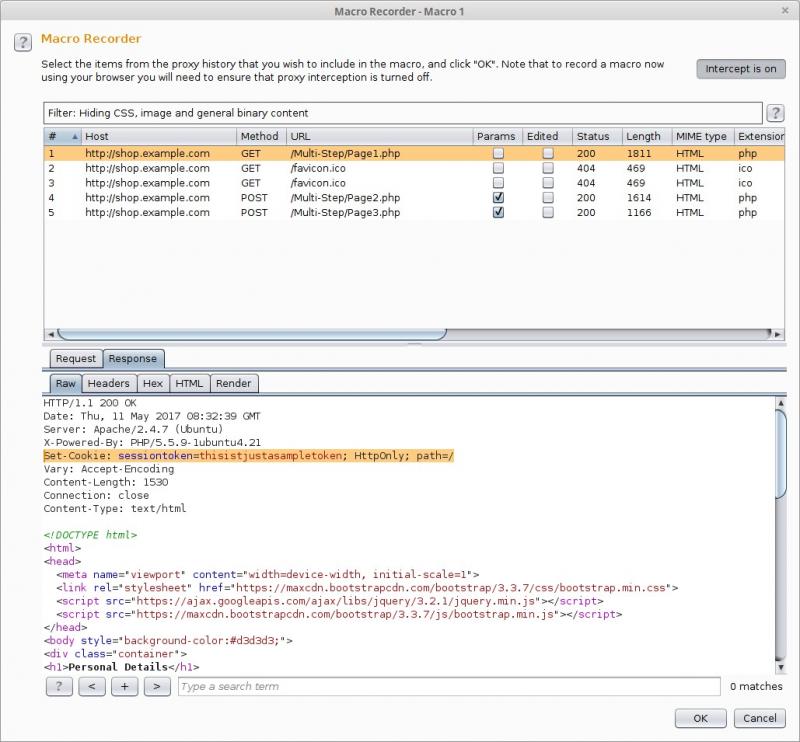
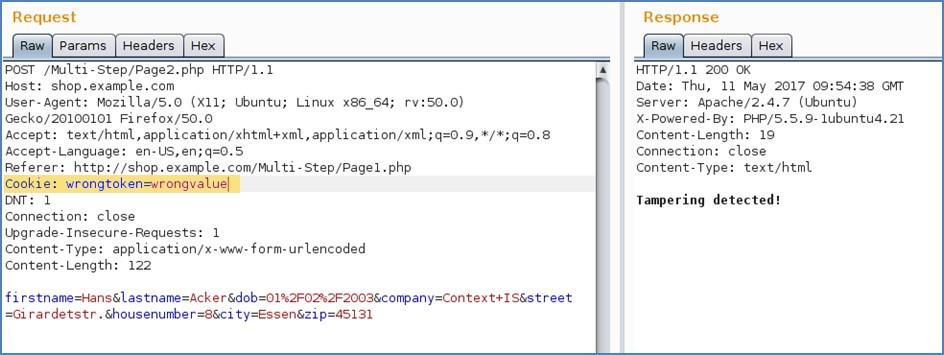
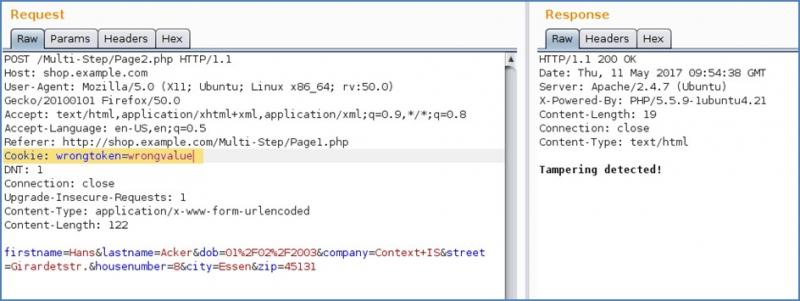
The target for our test is the ‘sessiontoken’ which is issued by the server when visiting ‘Page1.php’:

To assess its validity and extent, we try modifying it before requesting ‘Page2.php’. We get an error message ‘Tampering detected!’ which suggests that the application is validating the ‘sessiontoken’ before processing ‘Page2.php’ and ‘Page3.php’:

Step 1: Get Sessiontoken + Go to Fuzz point
Now that we’ve established how the application validates data within the multi-step form, we can start building our macro. First, we need to define a macro that will retrieve the ‘sessiontoken’ and moves us to the point where we can perform semi-automated input validation.
To create the macro, click on ‘Add’ button of the Macro section:

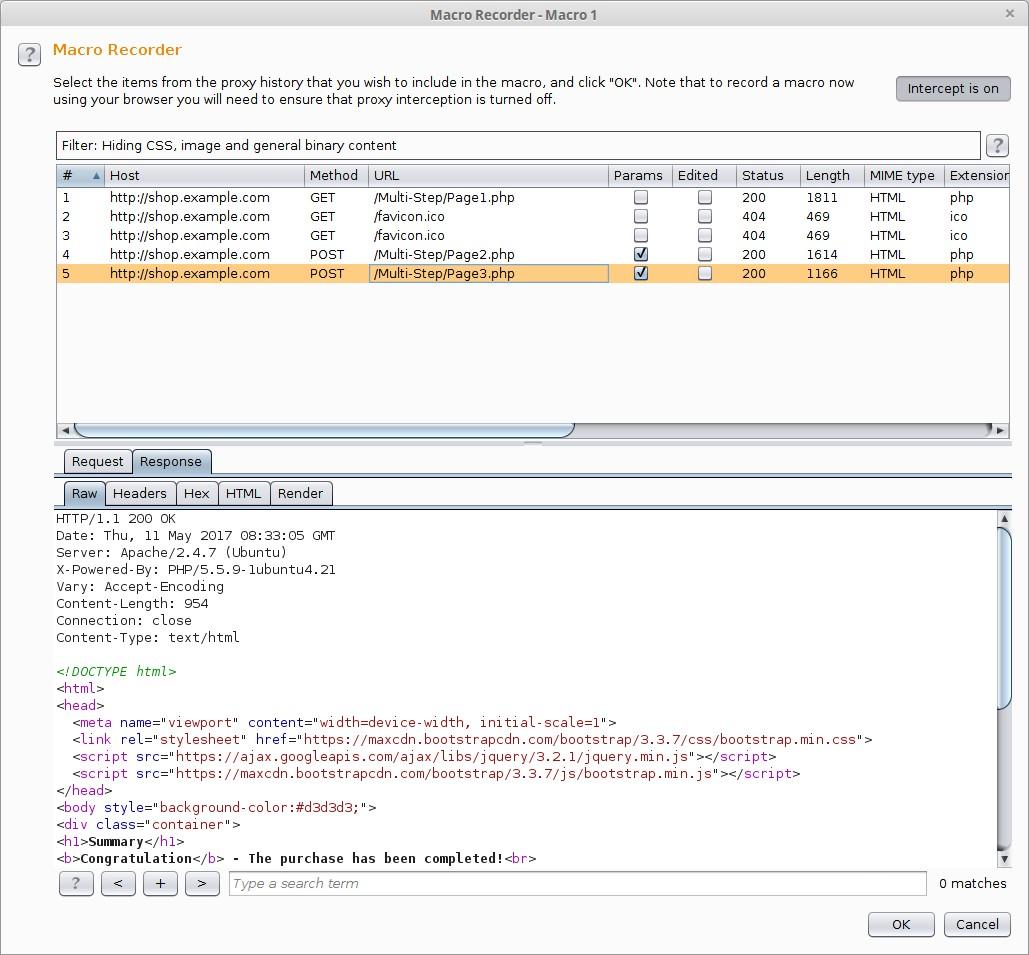
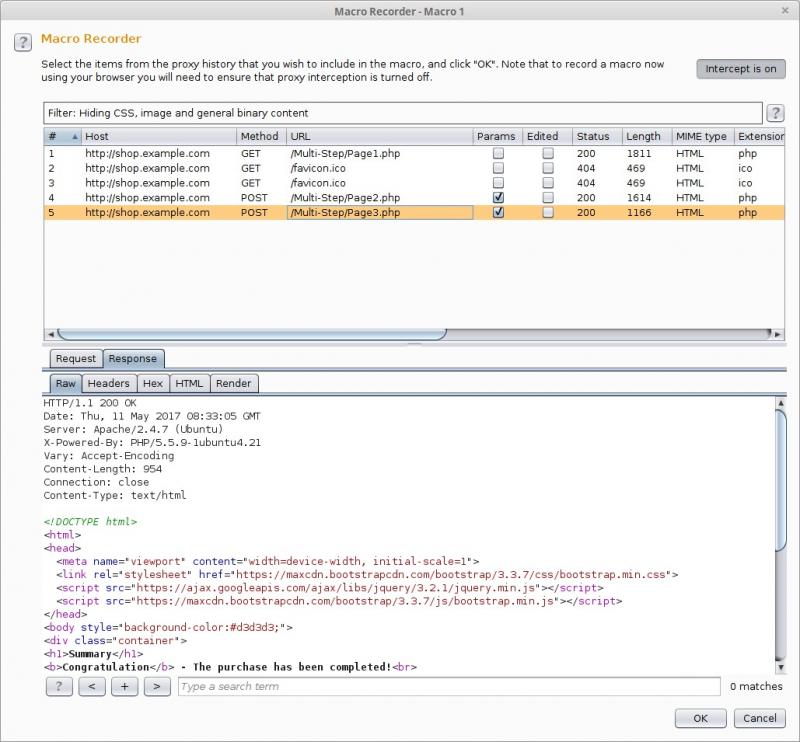
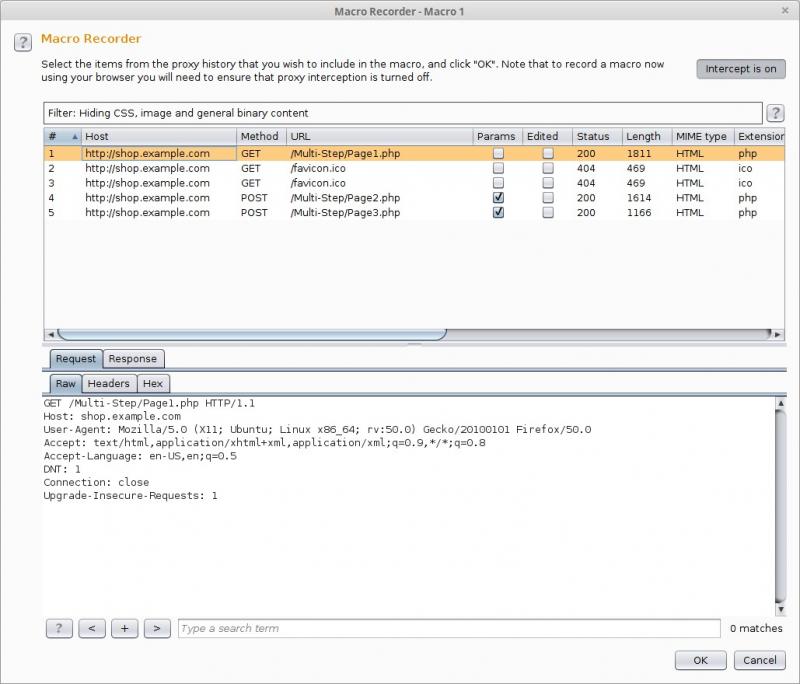
A new window pops up, that’ll show the previous requests made in a fashion that is very similar to the Proxy history tab:

Here select one or more requests that you want to use in the macro and click ‘OK’. In our case, we only need to use the first page as this will allow us to obtain a new ‘sessiontoken’ from the server, and also contains the input fields that we want to test.
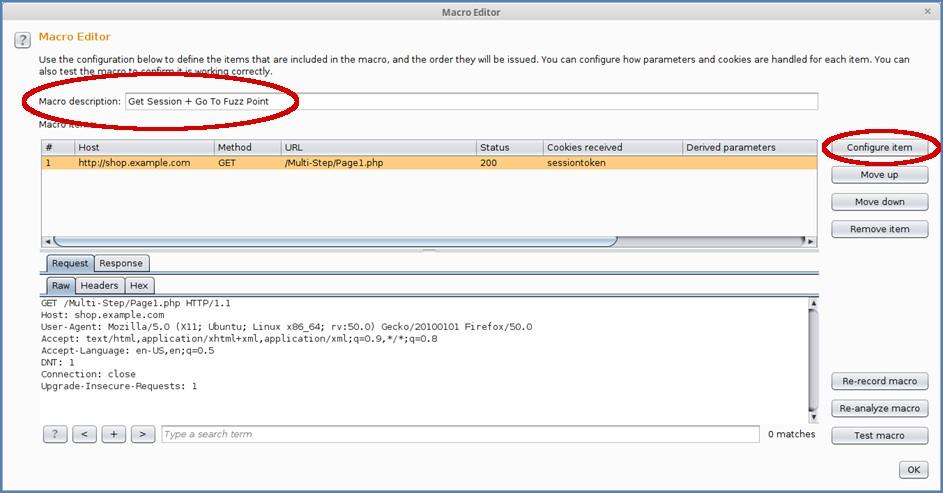
We are now in the main macro editor view. From here we can analyse and modify the individual requests we’ve selected previously. We can also specify custom parameters that Burp should extract for us from the response, although this is not something that we will cover in this particular guide.

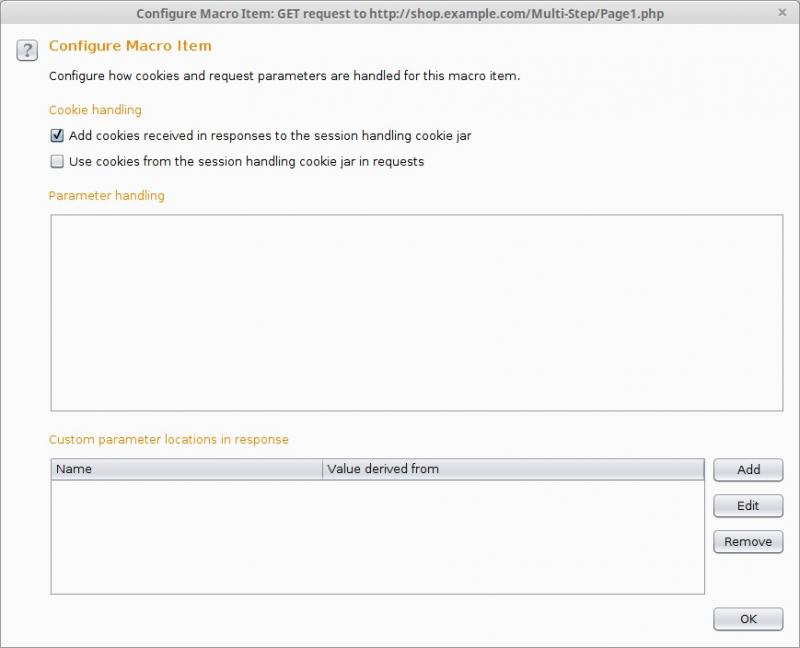
Next, we can provide a descriptive name for the Macro and also make sure that burp does not use a cookie from the Cookie Jar for our initial request. This will make sure that the server will always issue a new and valid ‘sessiontoken’ for us.
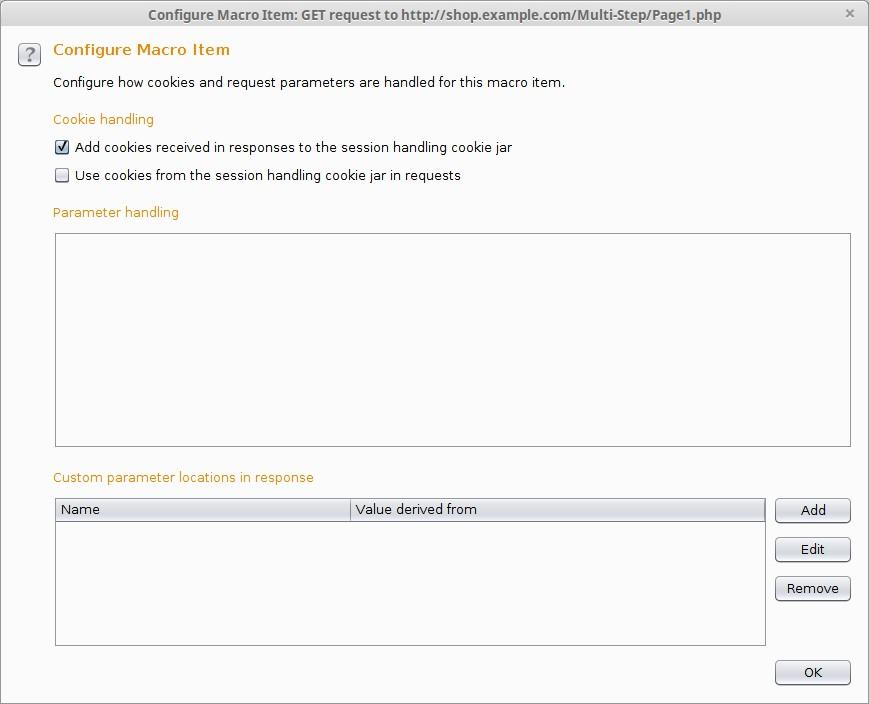
To configure this behaviour we select request #1 and click on Configure item’ in the macro editor (see above); in the new pop-up (see below) we uncheck the entry ‘Use cookies from the session handling cookie jar in requests’. Save the macro by clicking on ‘OK’ in both these windows.
We will be redirected to the Session tab and our first macro would have been successfully created.

Step 2: End to End Fuzzing
Now, we will set up a second macro in a similar fashion to ‘walk’ through the rest of the multi-step process, after we have tested the input fields on Page 1.
Quick recap: Step 1 has shown how to create a macro that walks to the point where the fuzzing should take place. Here you can use your tool of choice (Intruder, Repeater, Scanner, etc.) later, but before there is a few more steps to set up. We will now discuss Step 2, which deals with navigating to the end of the multi-step form. In our example, Page3.php shows the summary page; keep in mind that the end could be any page, not necessarily the last one in the process.
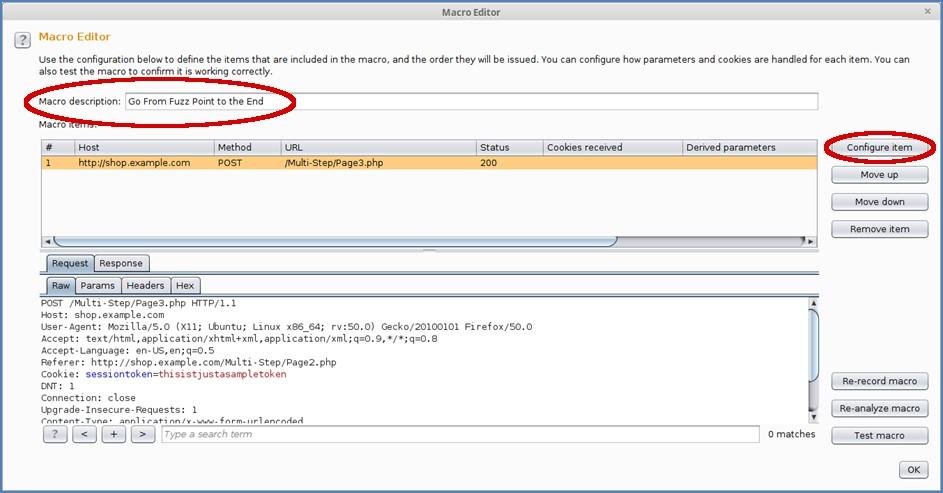
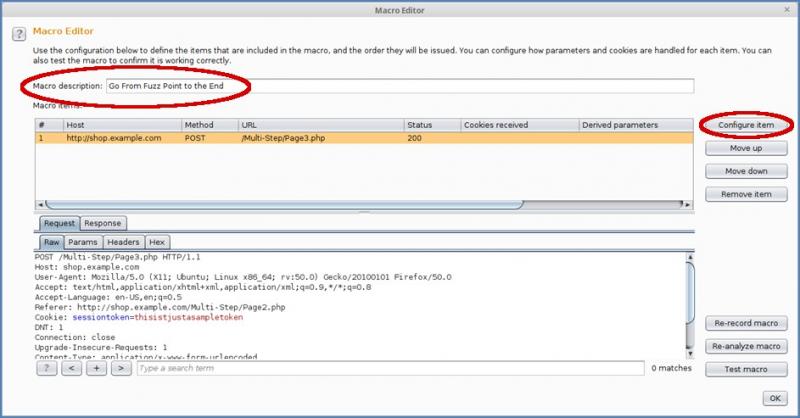
Set to work: In the macro section click on ‘add’ once again. This time select the request which calls Page3.php (request #5 in the screenshot at the beginning) and click on ‘ok’. This will pop-up the macro editor for this macro:

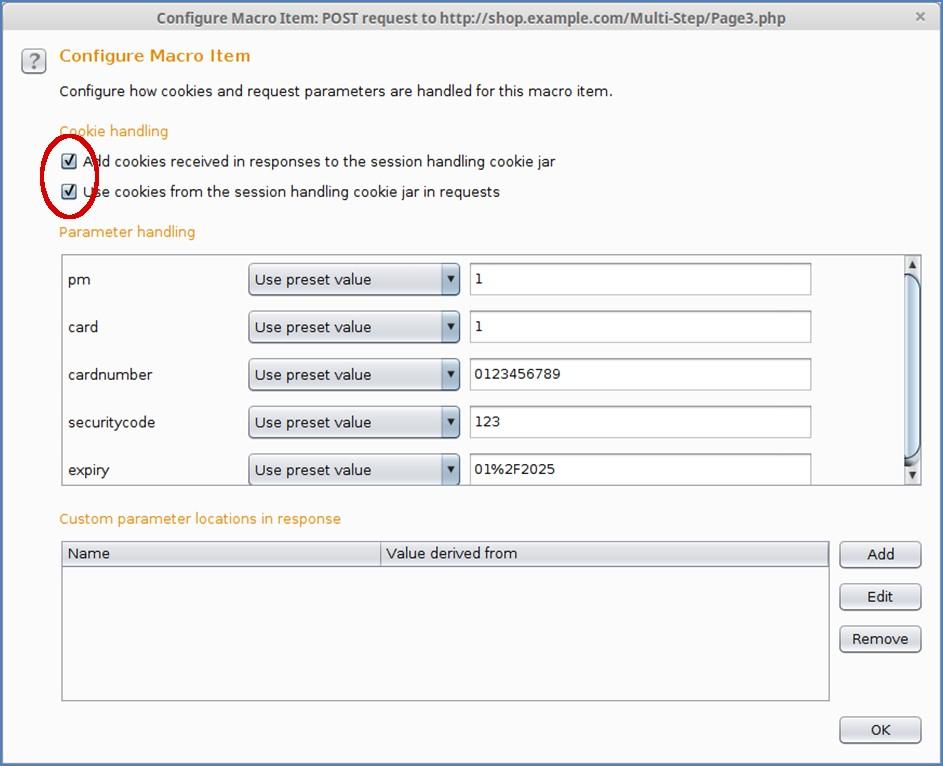
Give it a descriptive name so that it’s possible to identify the purpose of the macro. Ensure that Burp updates the Cookie jar within this macro (opposite of what we did in Step 1). This is actually the default state, so you shouldn’t need to change anything. But, for good measure we’ll click on ‘Configure item’ and make sure that both checkboxes are ticked:

Save the macro by clicking on ‘OK’
Step 3: Setting up a Session Handling Rule
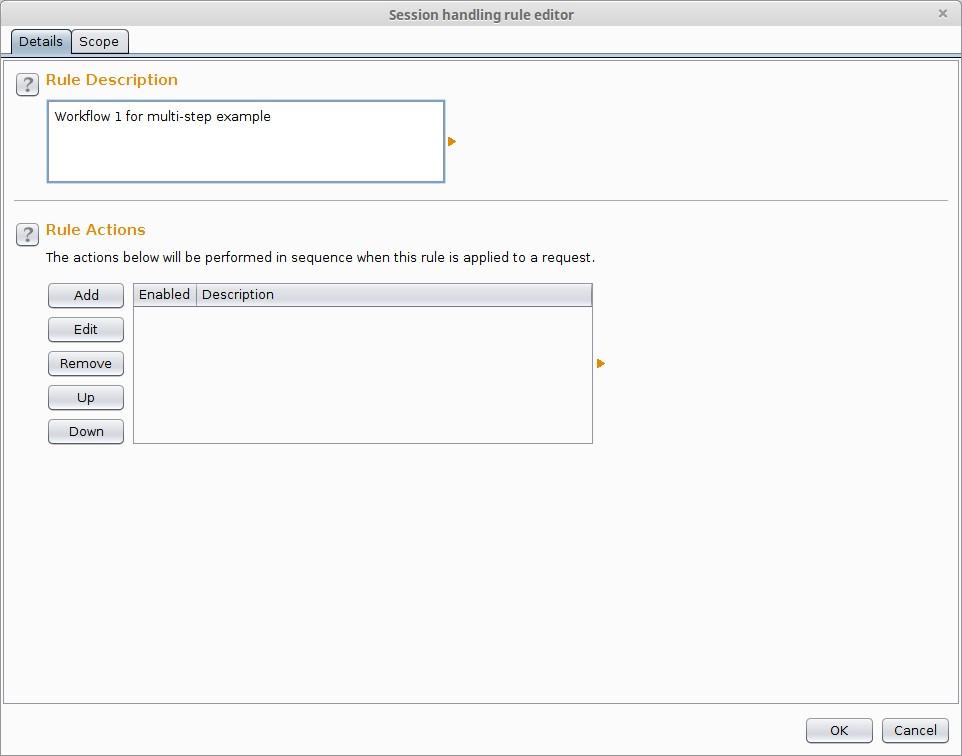
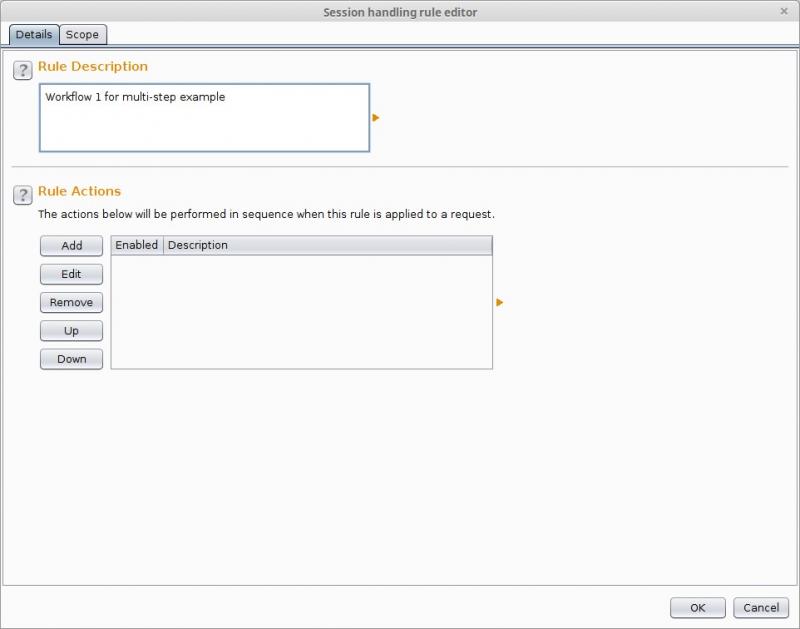
We now have to tell Burp how best to use the two macros we created. Within the ‘Sessions’ tab, click on the ‘Add’ button within the ‘Session Handling Rules’ section.

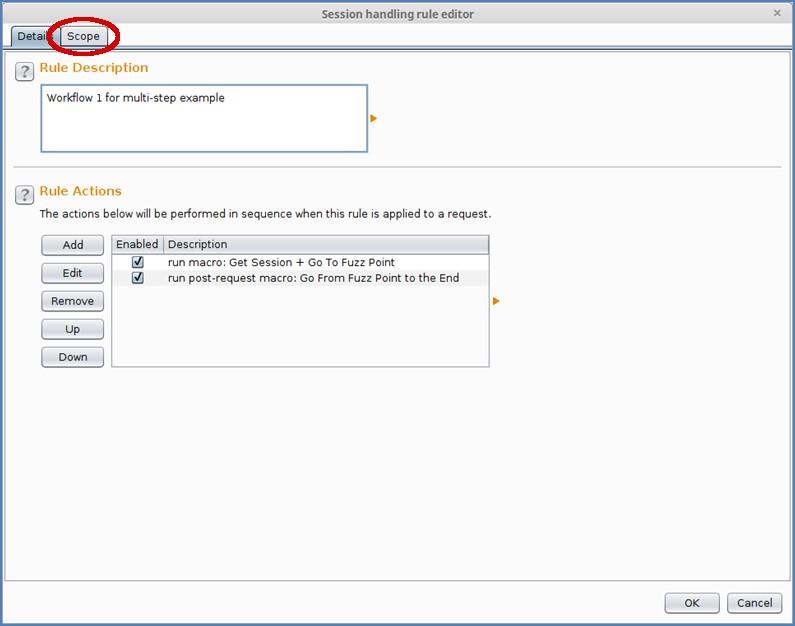
Provide an identifiable title for this rule, e.g. ‘Workflow 1 for multi-step example’.

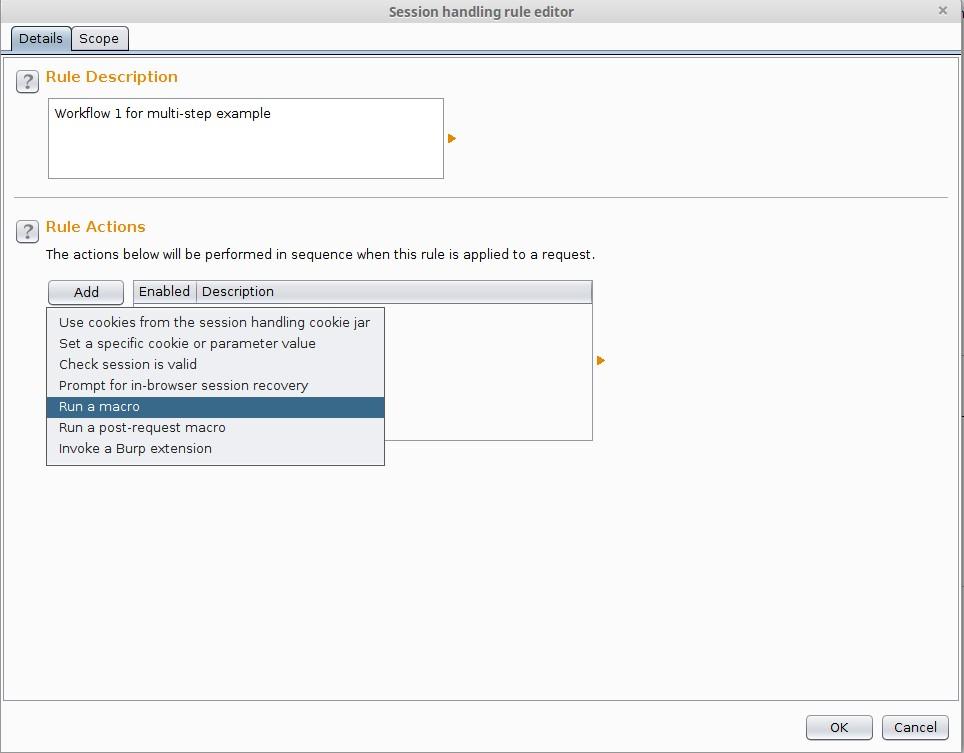
Click on ‘Add’ in the ‘Rule Actions’ section and select ‘Run a macro’ from the dropdown list:

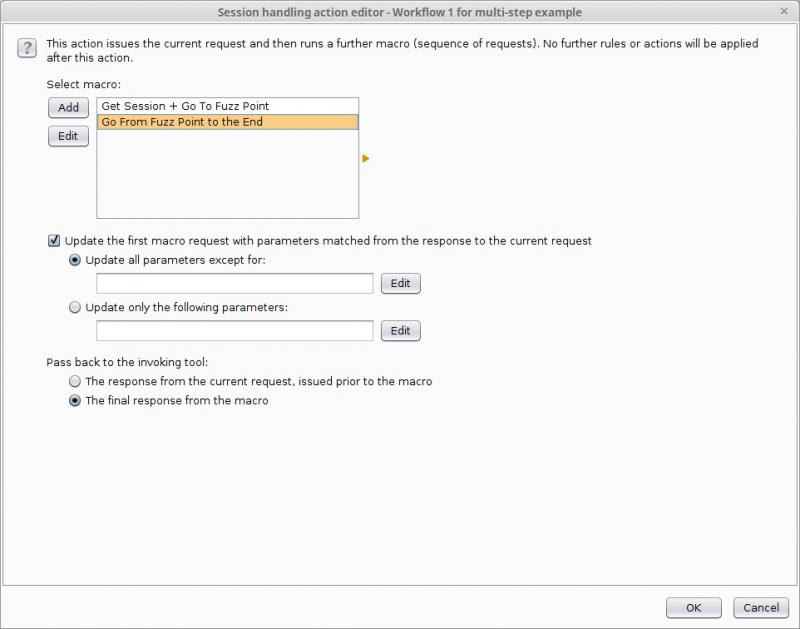
In the window that pops up, select ‘Get Session + Go To Fuzz Point’ (so that it is highlighted yellow – no need to click on ‘add’ as it would create a new macro altogether) as this is the macro we want to run before the actual fuzz request. The defaults on this page are fine for our example, so we click on ‘OK’.

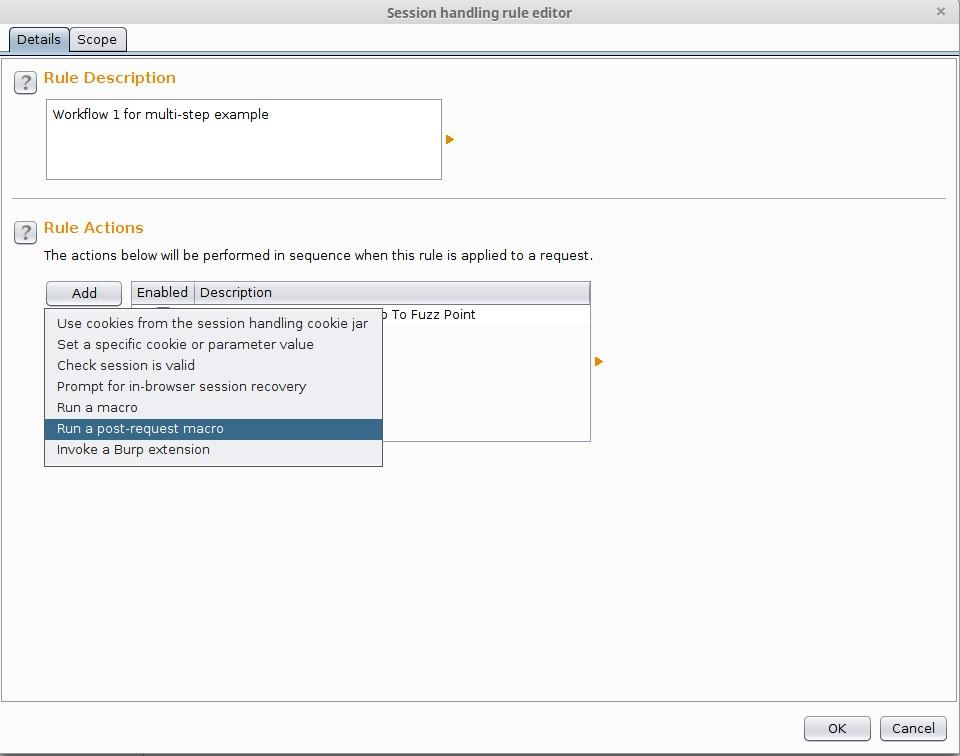
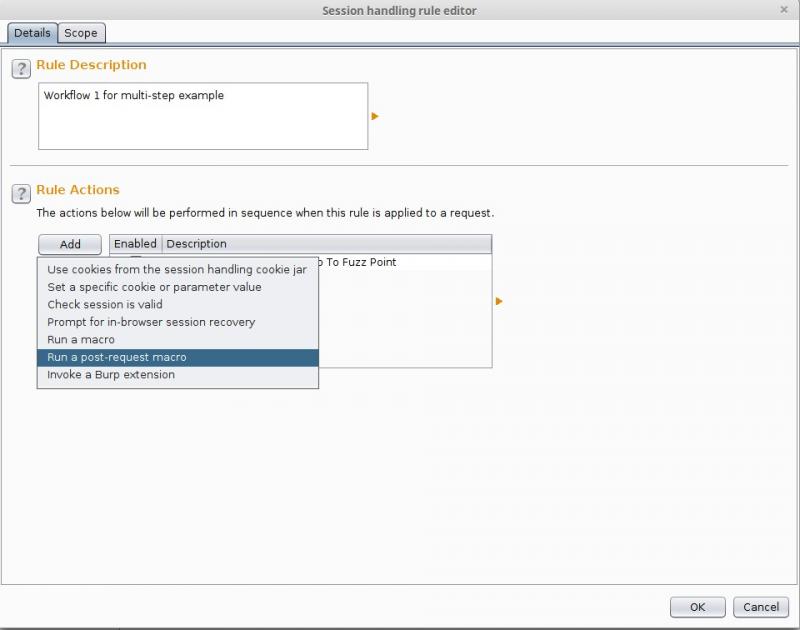
Next, click ‘Add’ again and select the ‘Rule Actions’ section again. This time, select ‘Run a post-request macro’ and select the second macro that will take us to the end of the form, after the fuzzing request has been issued.

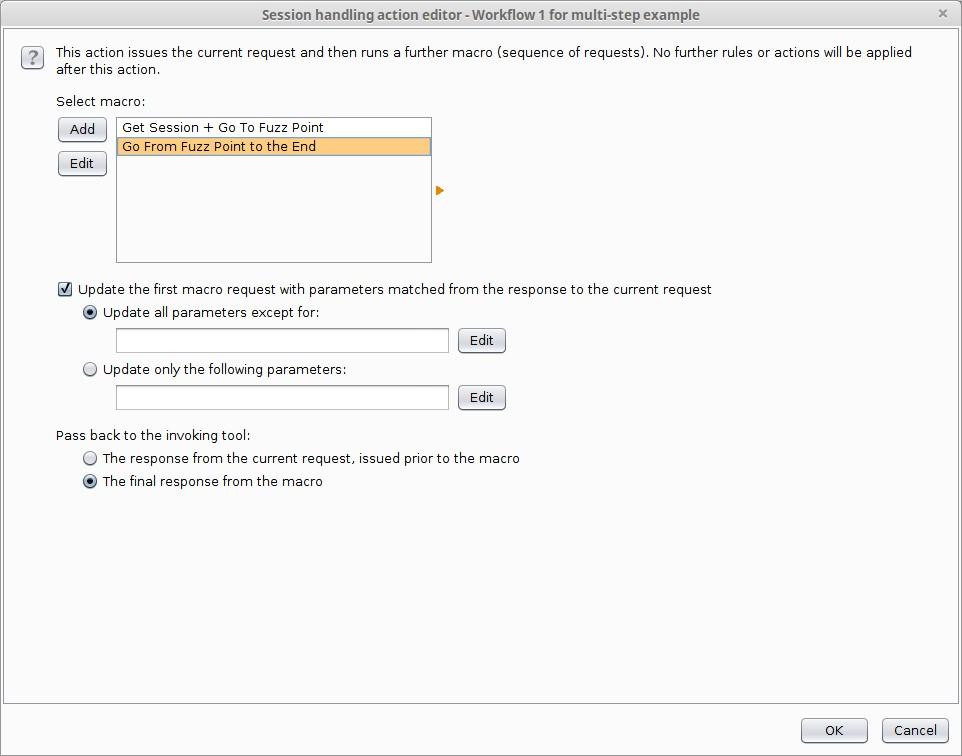
Select the second macro ‘Go From Fuzz Point to the End’ from the window that pops up and click on ‘OK’. Leave the rest of the settings in their default state:

Now that we’ve told Burp how the macros should be applied, next we need to specify when they should be applied. Click on the ‘Scope’ tab within the Session handling rule editor window:


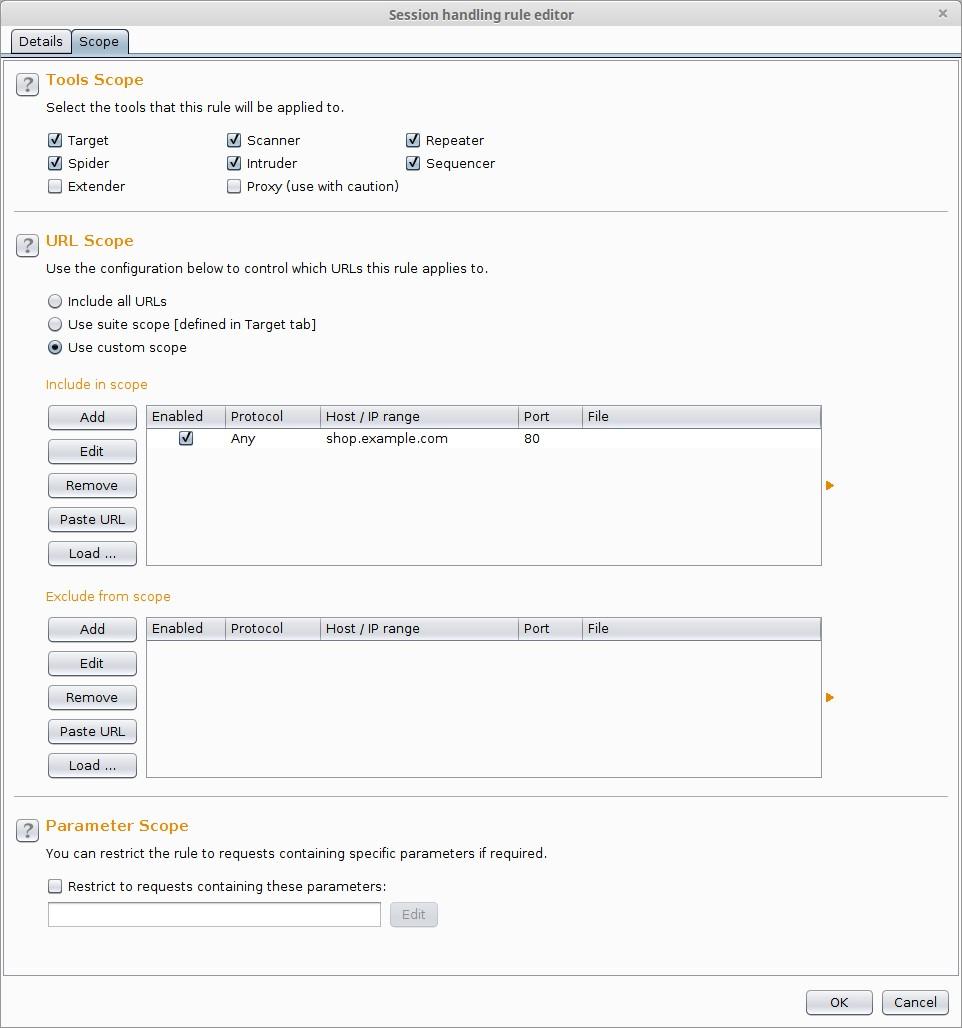
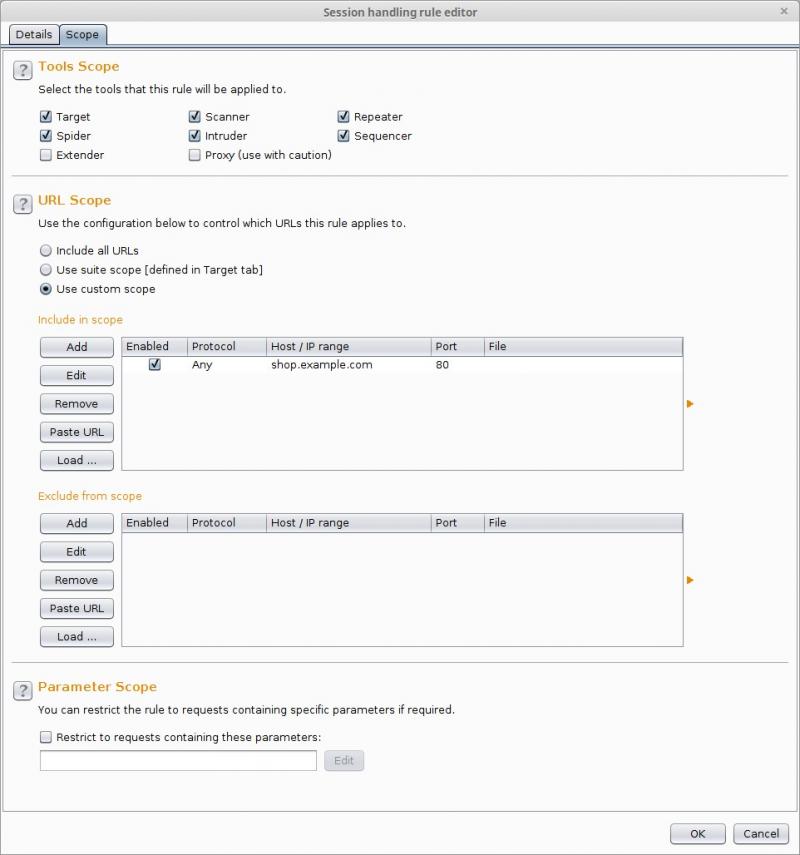
Specify which tools should utilise this particular session handling rule. The default tool selection is fine for our example. However, the macro should only be executed when a request is issued to shop.example.com application. Therefore adapt the scope accordingly. ‘Use custom scope’ and click on ‘Add’ under the ‘Include in scope’ heading, here set whatever fits your case. In this example any protocol, shop.example.com as host and port 80 will work fine. As file specify the part of the URL that is not part of the domain, in our case this could be ‘^/Page2.php$’ (without ‘ ’). Next, click ‘ok’ twice to first set the scope and then to finish the session handling rule.
Please note, if the file parameter is not specified or the scope is otherwise too broad then burp will run the specified macro over and over again for every single request that matches the scope. In the default settings this includes objects from the ‘Target’, ‘Scanner’, ‘Repeater’, ‘Spider’ and ‘Intruder’ tool. Not only will this cause lots of traffic, but it will also take its toll on testing time and logs created. In worst-case scenario, this could interfere with the overall scope of the engagement. Imagine a scope where only the domain and port are specified: The macro gets executed on every page visited on that domain. E.g. using the repeater to send a request to http://shop.example.com/robots.txt, will not respond with the robots.txt file as one might expect, but instead it will ‘walk’ to http://shop.example.com/Page1.php, then issue a get request to http://shop.example.com/robots.txt and afterwards walk to the end of the macro, which is defined as http://shop.example.com/Page3.php. So instead of seeing the robots.txt burp will display the content of Page3.html. So care must be taken when setting the scope.
Step 4: Final run and Session Tracer
The session rule should now be in effect for the scope that we have defined. To test this we click on ‘Open session tracer’, which is a great tool to debug session rules.

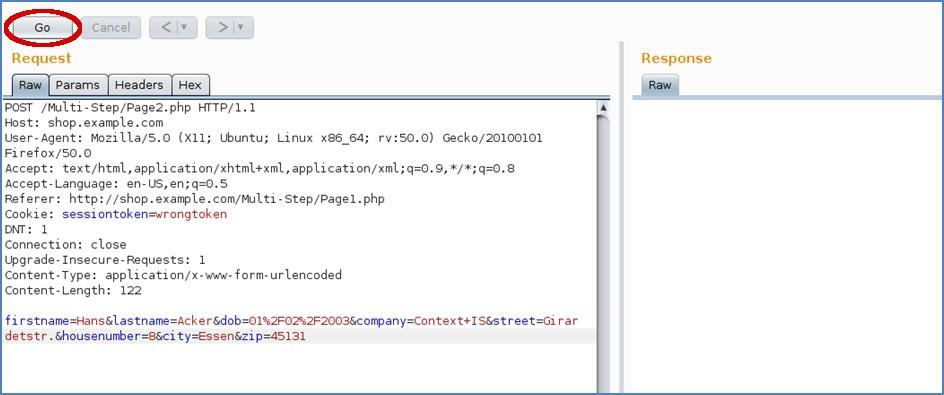
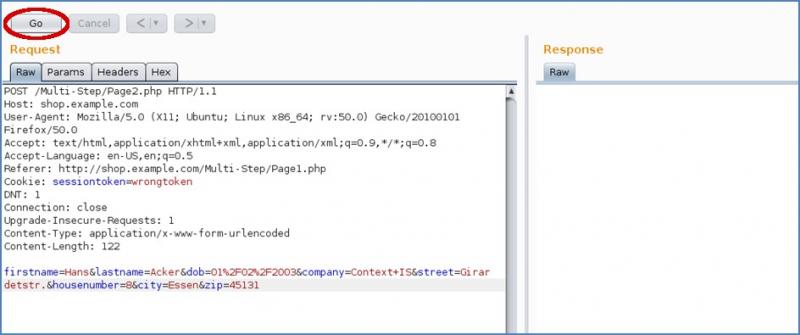
Leave the window open and head over to the Proxy History tab. Here, select the request for Page2.php and send it to the Repeater (Ctrl+r). Now, head over to the Repeater tab and click ‘Go’. Observe the changes:


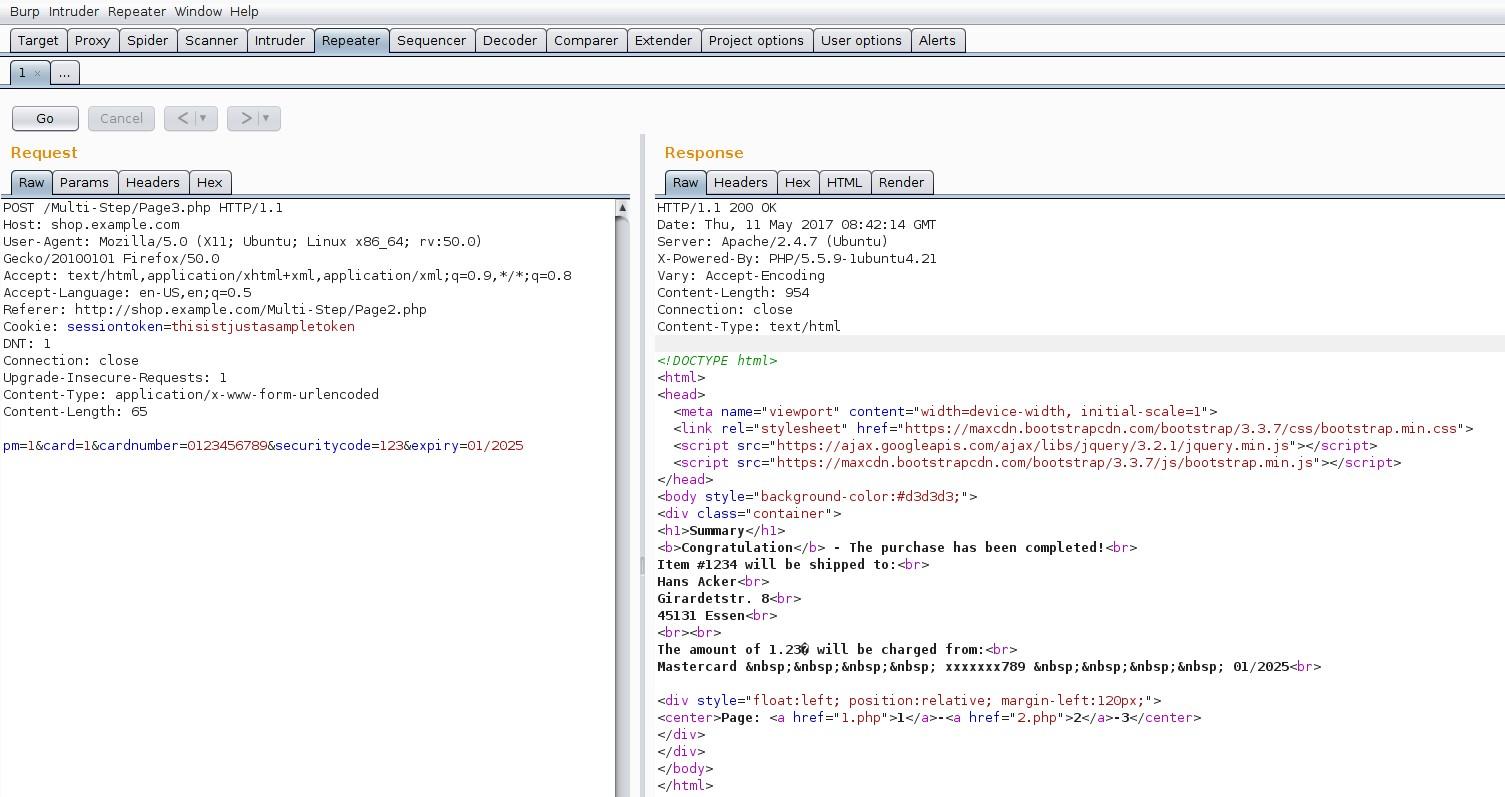
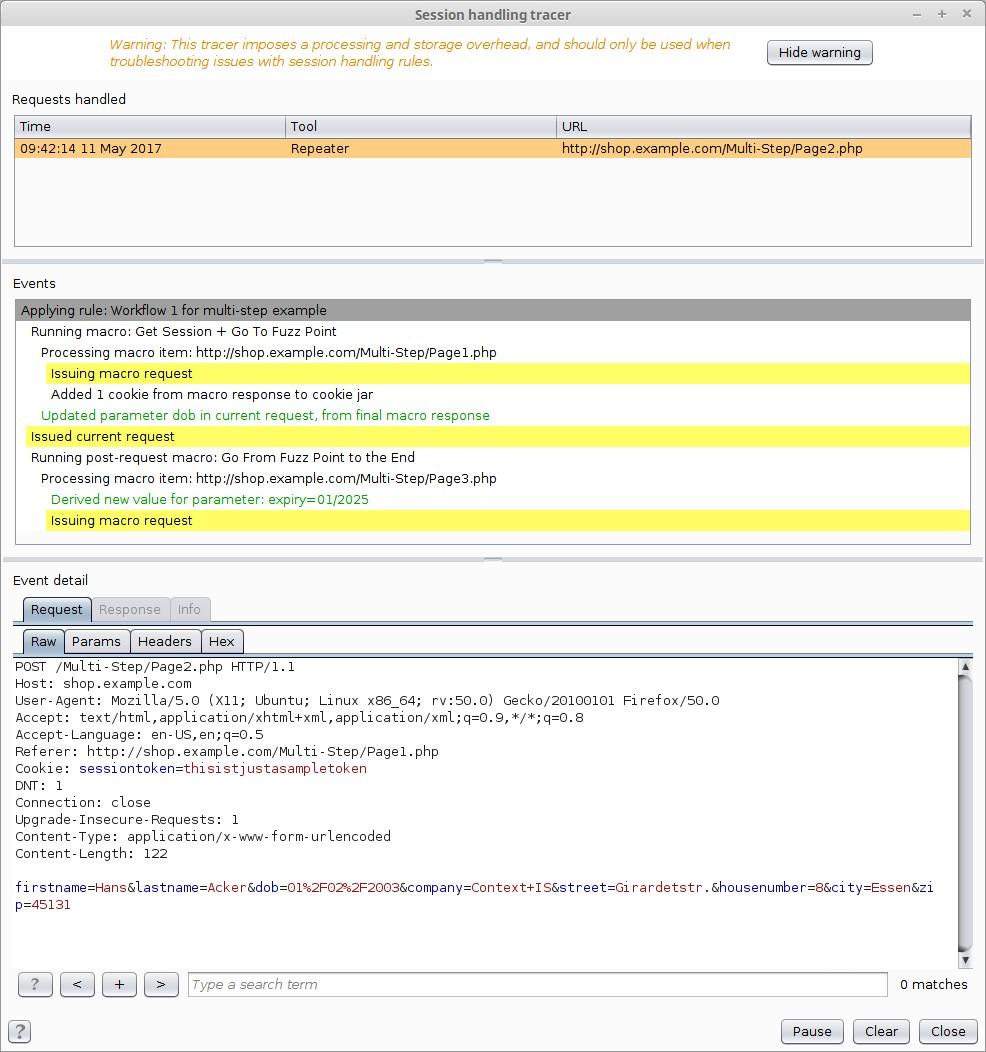
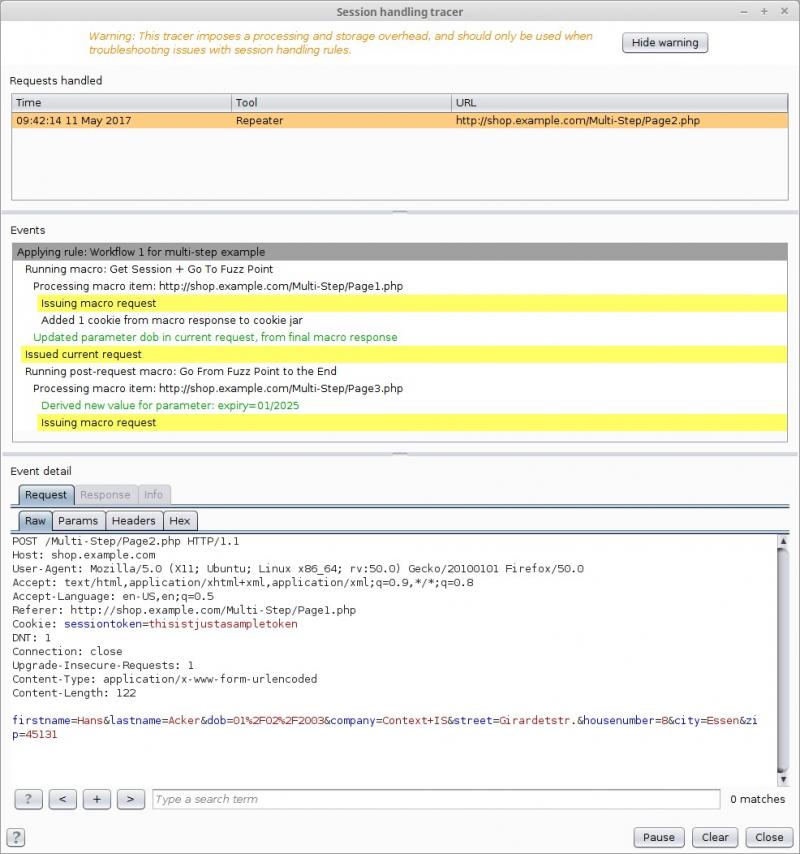
Observer that after sending a request to ‘Page2.php’ (from the Request section), both the Request (left) and Response (right) sections changes. Both sections now show the request and response of ‘Page3.php’ instead of ‘Page2.php’. This is because Burp automatically sent the request to ‘Page3.php’ as per the macro we previously configured.
To debug the actions, open the Session tracer window we previously accessed. This window should now reveal the request that was modified using macros along with description of all the changes that were performed automatically:

Conclusion
We’ve successfully set up a session handling rule with two macros that will walk us to the point where we want to fuzz and walk us from there to the end. This will allow us to automate the fuzzing process for a multi-step form with minimal manual input.
If you have read the first part of this blog entry then you’ll know that we only tested one form page of a multistep form, several other exists for which we will have to fashion appropriate macros.
We hope this blog has given you an insight into the intricacies of real world testing and how to overcome them (at least one small part of it). Happy testing :)